Master The Art Of Drawing A Fox: A Step-by-Step Guide
Ever wondered how to draw a fox that captures its elusive charm and playful spirit? From their iconic bushy tails to their cunning eyes, foxes are captivating creatures that make for incredibly rewarding subjects in art. Whether you're a complete novice picking up a pencil for the first time or an experienced artist looking for a fun new project, learning to draw a fox can be an incredibly fulfilling journey, opening up a world of creativity and self-expression. This comprehensive guide is designed to make the process accessible and enjoyable for everyone, ensuring that kids and beginners alike can now draw a great looking fox.
This article will take you through every essential step, from gathering your basic art supplies to adding intricate details like fur and expressive eyes. We’ll explore various styles, from simple outlines and adorable chibi foxes to more detailed, realistic representations. By breaking down the process into manageable, easy-to-follow instructions, you'll gain the confidence and skills needed to create your very own charming fox illustrations. So, grab your drawing tools, and let's embark on this exciting artistic adventure together!
Table of Contents
- Why Learn How to Draw a Fox?
- Essential Art Supplies for Your Fox Drawing Journey
- Starting Your Fox Drawing: The Foundation of Form
- Step-by-Step Guide: How to Draw a Fox Head and Face
- Building the Body: From Outline to Playful Illustration
- Mastering Different Fox Styles: Cartoon vs. Realistic
- Refining Your Fox Drawing: Inking and Coloring
- Practice Makes Perfect: Continuous Improvement
- Conclusion
Why Learn How to Draw a Fox?
Foxes hold a special place in our imagination, often depicted as clever, agile, and incredibly beautiful creatures. Their striking appearance, with their pointed ears, slender muzzles, and often vibrant reddish-brown fur, makes them a fascinating subject for artists of all levels. Learning how to draw a fox isn't just about replicating an image; it's about understanding anatomy, form, and expression, which are fundamental skills applicable to all kinds of drawing.
For beginners, drawing a fox offers a fantastic opportunity to practice basic shapes, proportions, and shading techniques in an engaging way. The distinct features of a fox provide clear guidelines, making it easier to follow along with tutorials and see tangible progress. For children, it's a fun and rewarding activity that boosts fine motor skills, observation, and creativity. The satisfaction of completing a drawing of such a beloved animal is immense, fostering a love for art that can last a lifetime. Plus, the versatility of fox illustrations, from whimsical cartoons to detailed wildlife portraits, means there's always something new to explore and master.
Essential Art Supplies for Your Fox Drawing Journey
Before you dive into the exciting process of learning how to draw a fox, it's helpful to gather a few basic art supplies. You don't need a professional art studio to get started; a few simple tools will suffice. Think of these as the "🎨 art supplies we love" that make the drawing process smoother and more enjoyable.
- Pencils: You'll primarily use graphite pencils. An HB pencil is great for initial sketches, as it's not too dark and erases easily. For darker lines and shading, consider a 2B or 4B pencil. These softer leads will give you richer tones and allow for more expressive lines.
- Erasers: A good quality vinyl or plastic eraser is essential for cleaning up mistakes without smudging. A kneaded eraser is also incredibly useful for lifting graphite lightly without completely removing lines, perfect for refining your initial sketches.
- Paper: Any standard drawing paper or even printer paper will work for practice. However, if you plan to add color or more detailed shading, a slightly thicker paper (like sketch paper or Bristol board) will hold up better and prevent bleed-through. A sketchbook is ideal for keeping all your practice drawings in one place.
- Fineliner Pens or Markers: Once your pencil sketch is complete, you'll want to "fill in the finer details and enhance your initial outline with a pen or marker." A black fineliner pen (0.1mm to 0.5mm) is perfect for creating clean, crisp outlines. For bolder lines or filling in larger areas, a slightly thicker marker can be used.
- Coloring Tools (Optional but Recommended): To bring your fox to life, consider adding color. Colored pencils are excellent for beginners as they offer control and allow for layering. Watercolors, pastels, or even digital art software can also be used, depending on your preference and skill level.
Having these basic "drawing utilities like paper, pencil, eraser" ready will ensure you have everything you need to start creating your perfect fox.
- How Did Frenchie Get Out Of Jail
- Ballers Perry Ga
- Jacqueline Mazarella Nudes
- Aroma Sensei Irl
- Melissa Shawty
Starting Your Fox Drawing: The Foundation of Form
The secret to creating any successful drawing, especially when you're learning how to draw a fox, lies in building a solid foundation. This means starting with simple shapes and guidelines before moving on to the intricate details. This approach simplifies complex forms and helps you maintain correct proportions.
The Power of Basic Shapes: Circles and Ovals
The very first step, whether you’d like to draw a fox in a cartoon style or a more realistic fashion, is to start by sketching a pencil outline made of various circles and ovals. These fundamental shapes act as the skeleton of your fox, guiding you in placing its main body parts accurately.
Begin by lightly sketching a large oval for the main body of the fox. This doesn't need to be perfect; it's just a placeholder. Next, draw a smaller circle or oval above and slightly overlapping one end of the body oval for the head. For the muzzle, add an even smaller circle or oval extending from the front of the head. Think of these as building blocks, loosely connected. This method helps you visualize the fox's overall pose and size before committing to specific lines. Remember, these initial lines should be very light, as you'll be erasing them later.
Establishing Proportions and Guidelines
Once you have your basic shapes, it's time to establish the overall proportions and add some guiding lines. These lines will help you define the fox's posture and the placement of its features. For instance, a curved line for the spine can indicate whether your fox is standing, sitting, or pouncing. Light lines for the legs and tail will help you gauge their length and position relative to the body.
Consider the fox's characteristic features: a relatively large, bushy tail, slender legs, and pointed ears. Use your initial circles and ovals as anchors, then extend light lines to mark where these features will go. For example, from the head circle, you might draw two light triangular shapes for the ears. From the body oval, a long, curved line can indicate the flow of the tail. These guidelines are crucial for creating a balanced and realistic looking line drawing of a fox. Don't press too hard; these are just guides that will be refined or erased as you progress.
Step-by-Step Guide: How to Draw a Fox Head and Face
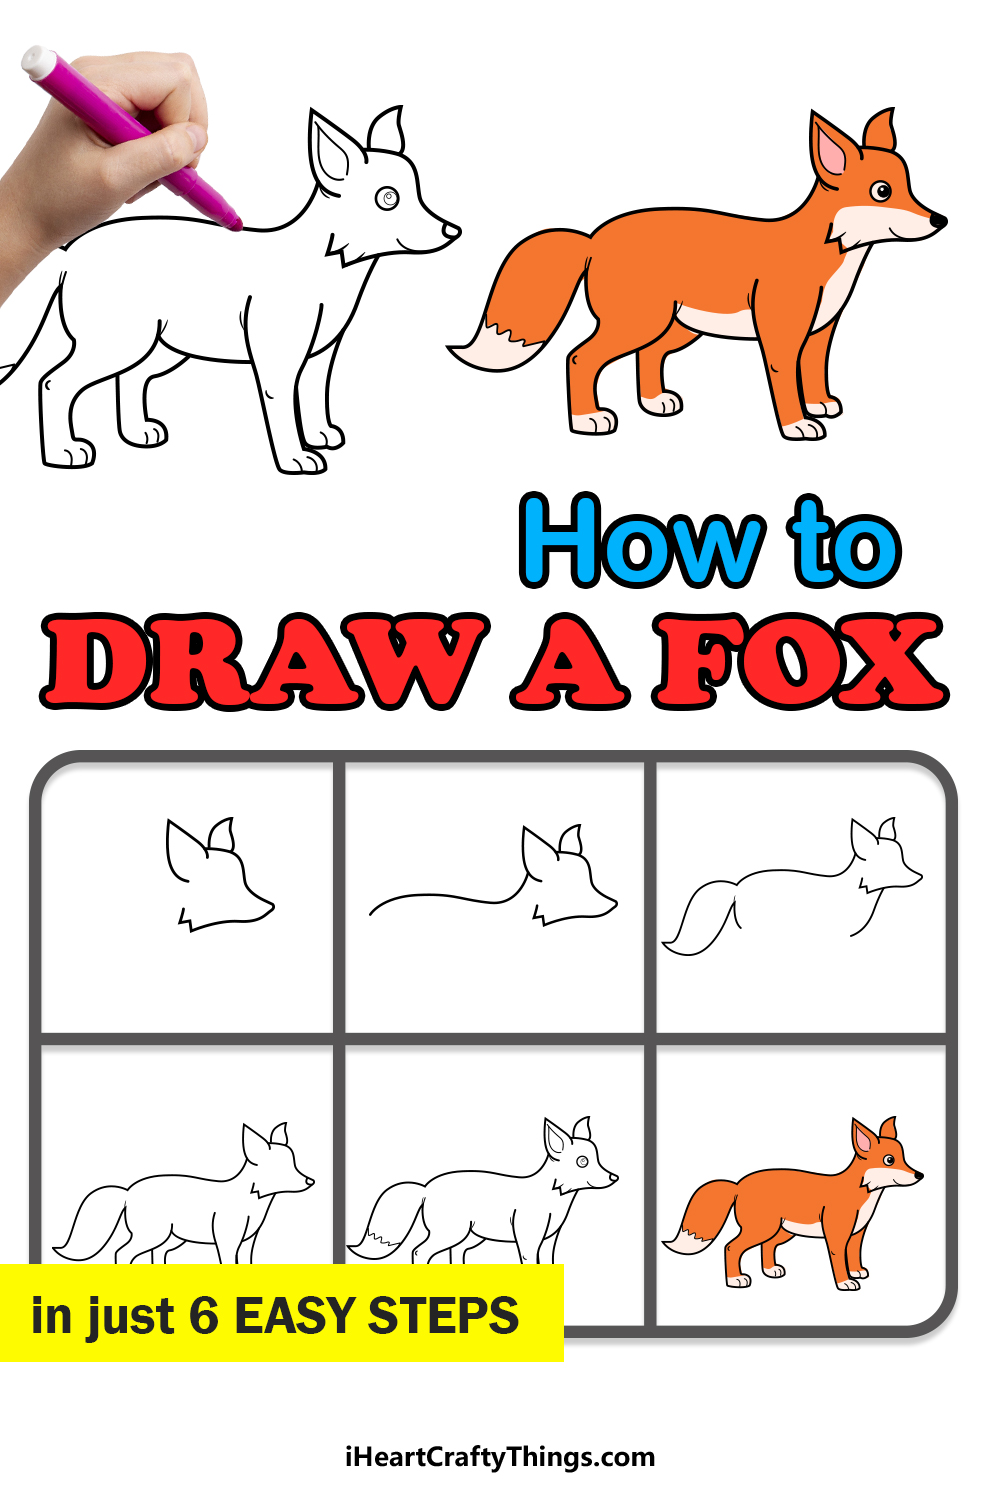
The head and face are arguably the most expressive parts of any animal, and learning how to draw the head and face of a fox in fifteen steps with detailed illustrated examples and instructions can truly bring your illustration to life. We'll break down the key features to ensure your fox has that distinctive, alert, and sometimes mischievous look.
1. Refine the Head Shape: Start with the basic head circle you drew earlier. Gently refine its shape, making it slightly more pointed towards the chin area if you're going for a realistic look, or keeping it rounder for a cartoon style. 2. Place the Eye Line: Draw a light horizontal guideline across the middle of the head circle. This will help you position the eyes correctly. 3. Begin the Eyes: Begin the cartoon fox outline by drawing the eyes. Foxes typically have almond-shaped eyes. Place them on the horizontal guideline, slightly separated. For a cute cartoon fox, make the eyes larger and more expressive. For realism, keep them narrower and more focused. 4. Add Pupils and Highlights: Draw small circles or ovals for the pupils within the eyes. Add tiny white circles or dots for highlights – these give the eyes a sparkle and make them look alive. 5. Draw the Nose: Below the eye line, in the center of the face, draw an inverted triangle or a rounded "V" shape for the nose. For a realistic fox, add two small nostrils at the base. 6. Define the Muzzle: Connect the nose to the bottom of the head shape with two curved lines to form the muzzle. This area should gently protrude from the face. 7. Sketch the Mouth: From the bottom of the nose, draw a short vertical line downwards, then two curved lines extending outwards and slightly upwards to form the fox's mouth, often giving it a subtle smile or a neutral expression. 8. Add the Ears: Foxes are known for their prominent, pointed ears. Draw two triangular shapes on top of the head, slightly rounded at the tips. Ensure they are proportional to the head size. 9. Inner Ear Details: Add a smaller, slightly curved line inside each ear to indicate the inner ear structure and fur. 10. Cheek Fur: Draw some soft, jagged lines around the cheek area to suggest the fluffy fur. This helps to soften the face and add volume. 11. Forehead Details: Add subtle lines on the forehead to indicate fur direction and contours. 12. Facial Markings: Many foxes have darker markings around their eyes or on their muzzle. Lightly sketch these in to add character. 13. Refine Outlines: Once you're happy with the placement and shapes, go over your light pencil lines with a slightly darker pencil to define the features more clearly. 14. Erase Guidelines: Carefully erase any unnecessary construction lines. 15. Initial Shading (Optional): Add very light shading to suggest depth, particularly around the eyes, under the muzzle, and inside the ears.
This tutorial shows how to draw the head and face of a fox in fifteen steps with detailed illustrated examples and instructions, giving you a solid foundation for your full fox drawing.
Building the Body: From Outline to Playful Illustration
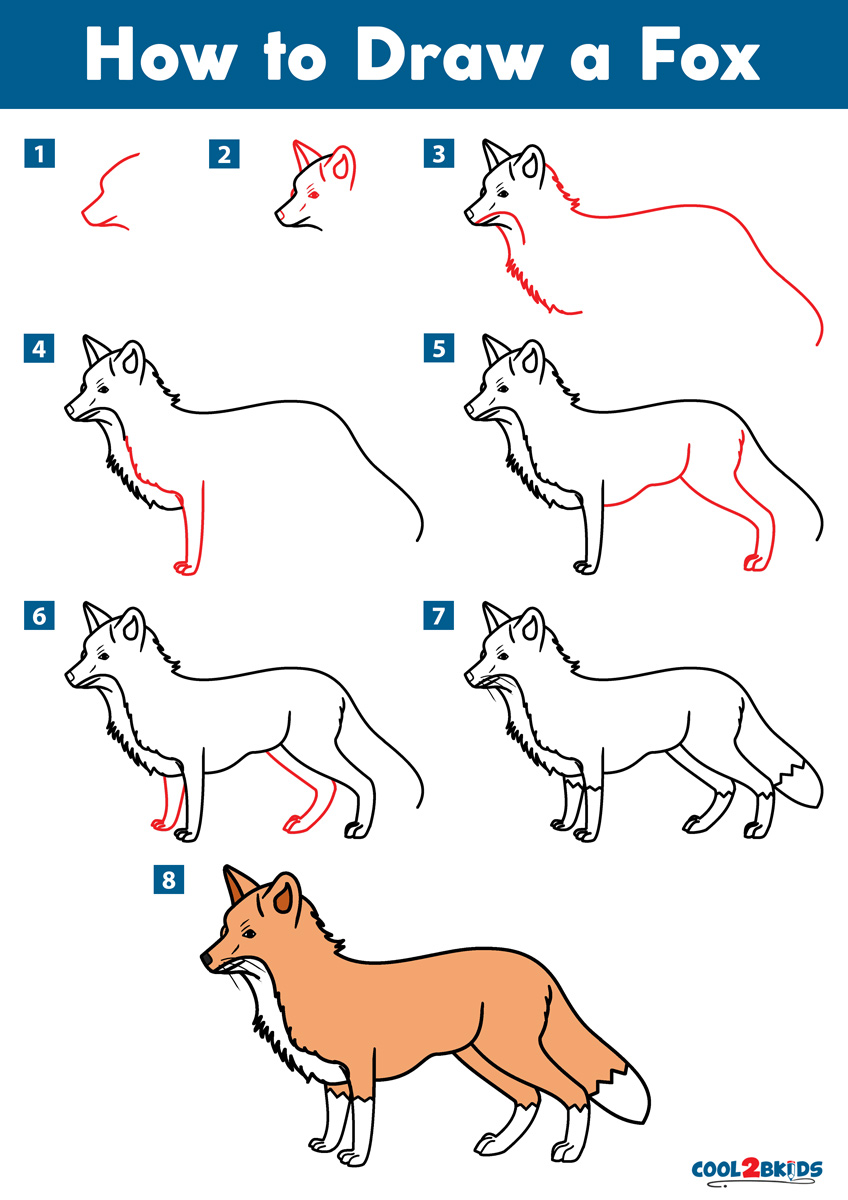
With the head complete, it's time to connect it to the body and bring your fox to life. This stage involves developing the initial basic shapes into a more defined form, adding limbs, and, crucially, the iconic bushy tail. Follow the simple outlines and guidelines you established earlier to create a realistic looking line drawing of a fox.
1. Connect Head to Body: Draw two curved lines from the base of the fox's head down to the large oval you drew for the body, forming the neck and shoulders. 2. Define the Torso: Refine the large body oval, giving it a more organic, slightly tapered shape towards the rear. Consider the natural curve of a fox's back and belly. 3. Sketch the Legs: Draw four slender, cylindrical shapes for the legs. Pay attention to the joints (shoulders, elbows, hips, knees) and how they bend. Foxes are agile, so their legs should convey this. Start with simple stick figures or light cylinders to get the pose right. 4. Add Paws: At the end of each leg, draw small, rounded shapes for the paws. Add subtle lines to indicate toes and claws. 5. The Tail: This is a defining feature of a fox! Draw a large, bushy, curved shape extending from the rear of the body. It should be thick at the base and taper slightly towards the tip, often with a white tip. Make it voluminous to convey its fluffiness. 6. Overall Flow: Step back and look at the entire fox. Does it flow naturally? Are the proportions correct? Adjust any lines as needed. You're aiming to create a playful and realistic fox illustration with fur, eyes, nose, and paws.
Adding Fur Texture and Detail
Once your basic outline is complete, adding fur texture will make your fox drawing truly come alive. Fur isn't just a flat color; it has direction, volume, and varying lengths.
- Directional Strokes: Use short, quick strokes of your pencil or pen to mimic the direction of the fur. On the head, fur usually grows downwards and outwards. On the body, it follows the contours. The tail will have long, flowing strokes.
- Layering: Don't try to draw every single strand of fur. Instead, layer your strokes. Start with lighter strokes, then add darker ones in areas of shadow or where fur is denser. This creates depth and realism.
- Varying Lengths: Notice that fur is shorter on the face and legs, and much longer and fluffier on the body and tail. Reflect this in your strokes.
- Highlights and Shadows: Think about where light is hitting your fox. Areas facing the light will have less fur detail and appear brighter, while areas in shadow (like under the belly, behind the legs, or under the muzzle) will have denser, darker fur texture.
Dynamic Poses and Expressions
A fox drawing can convey so much more than just its physical form. By exploring different fox breeds, expressions, and environments with examples and tips, you can add personality and narrative to your artwork.
- Expressions: A fox's expression is primarily conveyed through its eyes and ears. Alert, forward-facing ears and wide, focused eyes suggest curiosity or attentiveness. Flattened ears and narrowed eyes might indicate caution or fear. A slightly open mouth can show panting or a playful grin.
- Posing:
- Sitting: The body is more upright, with legs tucked under. The tail might wrap around the body.
- Running/Pouncing: Legs are extended, body is stretched, and there's a sense of motion. Use dynamic lines.
- Sleeping: Often curled up, tail wrapped around, face tucked in.
- Environment: A simple background can enhance your fox. A few blades of grass, a tree trunk, or a snowy landscape can tell a story about where your fox lives and what it's doing. Don't let the background overpower your fox, but use it to complement your subject.
Mastering Different Fox Styles: Cartoon vs. Realistic
One of the most exciting aspects of learning how to draw a fox is the versatility of styles you can explore. Whether you’d like to draw a fox in a cartoon style or a more realistic fashion, the foundational principles remain, but the execution changes dramatically. We’ll cover various styles, from simple outlines and chibi foxes to more detailed representations.
Cartoon Fox: Simplicity and Charm
Drawing a cartoon fox is often the easiest entry point for beginners, especially kids. The focus here is on exaggeration, simplified shapes, and conveying cuteness. In this tutorial will learn how to draw a cute easy cartoon fox, that is easy enough for kids in kindergarten and cute enough for older ones (and you) to love too.
- Exaggerated Features: Large, round eyes, a small button nose, and a generally plump body are hallmarks of a cute cartoon fox. The ears might be oversized, and the tail extra fluffy.
- Simplified Lines: Cartoon foxes rely on clean, flowing lines with minimal detail. Fur texture is often indicated by a few tufts or simplified patterns rather than individual strands.
- Chibi Foxes: A popular sub-style of cartoon drawing, chibi (meaning "small" or "cute" in Japanese) foxes feature extremely large heads relative to their tiny bodies, huge eyes, and minimal limbs, maximizing their adorable factor.
- Expressive Faces: Cartoon foxes often have very clear emotions – happy, curious, playful – conveyed through simple changes in eye shape or mouth curve.
Realistic Fox: Anatomy and Detail
For those who prefer a challenge and want to capture the true majesty of a fox, a realistic approach is key. This style demands a deeper understanding of anatomy, light, and shadow.
- Accurate Anatomy: Focus on correct proportions, muscle structure, and bone placement. Observe real fox photos or videos to understand their natural posture and movement.
- Detailed Fur: As discussed earlier, realistic fur requires careful layering of strokes, varying lengths, and attention to how light interacts with the texture.
- Subtle Expressions: While still expressive, realistic fox expressions are more nuanced. The tilt of the head, the slight tension around the eyes, or the position of the whiskers contribute to a more lifelike portrayal.
- Light and Shadow: Understanding how light falls on the fox's form is crucial for creating depth and dimension. Use shading to define contours, create volume, and make your fox appear three-dimensional. This is where your softer pencils (2B, 4B) will shine.
Whether you choose the charming simplicity of a cartoon or the intricate beauty of realism, the journey of learning how to draw a fox is incredibly rewarding. These simple techniques will have you creating adorable fox drawings in no time.
Refining Your Fox Drawing: Inking and Coloring
Once your pencil sketch is complete and you're happy with the form and details, it's time to bring your fox to its final stage: inking and coloring. This is where your drawing truly pops and takes on its vibrant personality.
Inking: Defining Your Lines
The process of inking involves going over your pencil lines with a more permanent medium, like a fineliner pen or marker. This step "will fill in the finer details and enhance your initial outline with a pen or marker," giving your drawing crispness and clarity.
- Steady Hand: Use a steady hand and confident strokes. Try to draw lines in one continuous motion rather than short, choppy ones.
- Line Weight: Varying line weight can add interest and depth. Use thicker lines for outlines and areas that are closer or in shadow, and thinner lines for internal details or areas that recede.
- Clean Up: Once the ink is completely dry (give it a few minutes to be safe!), gently erase all the underlying pencil lines. You'll be left with a clean, professional-looking line art.
Coloring: Bringing Your Fox to Life
Adding color is where your fox truly comes alive. Foxes come in a variety of colors, from the iconic reddish-orange of the Red Fox to the stark white of the Arctic Fox, and even the grey of the Gray Fox. Choose your palette based on the type of fox you're drawing or simply your artistic preference.
- Base Colors: Start by applying a light, even layer of the main color over the entire fox. This is your base.
- Layering and Blending: Build up colors in layers. For example, if using colored pencils, apply light pressure first, then gradually add more pressure or layer different shades to create depth. Blend colors seamlessly to avoid harsh lines.
- Shading and Highlights: This is crucial for making your fox look three-dimensional.
- Shading: Identify areas that would naturally be in shadow (under the chin, behind the legs, along the belly, within fur clumps). Use darker shades of your base color or complementary colors (like browns, greys, or even deep blues) to create shadows.
- Highlights: Areas directly hit by light will appear brighter. Use lighter shades, or even white, to add highlights to the top of the head, the bridge of the nose, the shoulders, and the tips of the fur.
- Details: Use a darker color or a fine-tipped pen to add small details like individual whiskers (if not already inked), paw pads, and the dark tip of the nose. Add a final sparkle to the eyes with a white gel pen or a tiny dot of white paint.
With careful inking and thoughtful coloring, your fox drawing will transform from a simple sketch into a vibrant and captivating piece of art.
Practice Makes Perfect: Continuous Improvement
The journey of learning how to draw a fox, or any subject for that matter, is a continuous one. While this guide provides you with easy drawing instructions and a step-by-step approach, true mastery comes with consistent practice and a willingness to experiment. By following the simple steps, you too can easily draw a perfect fox.
Don't be discouraged if your first few attempts aren't exactly what you envisioned. Every line you draw, every mistake you make, is a learning opportunity. Think of each drawing as a stepping stone towards improvement. The more you practice, the more familiar you'll become with the fox's anatomy, the flow of its fur, and its expressive features.
- Draw Regularly: Even short, daily sketching sessions can yield significant improvements over time.
- Experiment with Styles: Don't limit yourself to one style. Try drawing a cute fox, then a more realistic one. Experiment with different poses and expressions.
- Use References: Look at photos and videos of real foxes. Observe how their fur lies, how their muscles move, and the nuances of their expressions. This is invaluable for realistic drawing.
- Seek Feedback: Share your drawings with friends, family, or online art communities. Constructive criticism can help you identify areas for improvement.
- Enjoy the Process: Remember why you started drawing in the first place – for the joy of creation. Keep it fun!
By following this step by step tutorial you can draw fox without any difficulty. "Follow each step by step automatically you will render your fox." The more you engage with the process, the more natural and intuitive drawing will become.
Conclusion
You've now embarked on an exciting artistic journey, learning how to draw a fox from its foundational shapes to its intricate details. From understanding the power of simple circles and ovals to mastering the nuances of fur texture and expressive eyes, you have gained valuable insights and techniques to bring these captivating creatures to life on paper. We've explored everything from the essential art supplies to refining your work with inking and coloring, and even touched upon the charm of cartoon foxes versus the detail of realistic ones.
The beauty of drawing lies in its accessibility and the endless possibilities for creativity. Remember, every artist, no matter how skilled, started with a single line. The key is to keep practicing, keep observing, and most importantly, keep enjoying the process. Your unique artistic voice will develop with every stroke.
Now it's your turn! Pick up your pencil and paper, and let your imagination soar. We'd love to see your foxy creations! Share your drawings in the comments below, or explore other tutorials on our site to continue expanding your artistic horizons. Happy drawing!
- Kng Uniforms
- Venom Render
- Yale Tobin Center
- My Dystopian Robot Girlfriend Discord
- Harold Perkins 247

How to Draw a Fox - Step by Step Fox Drawing Tutorial - Easy Peasy and Fun
Fox Drawing - How To Draw A Fox Step By Step!
How to Draw a Fox - Cool2bKids
